Java 8新特性
1、Lambda表达式
1、初体验
目标:了解使用匿名内部类存在的问题,体验Lambda
匿名内部类存在的问题:当需要启动一个线程去完成任务时,通常会通过Runnable 接口来定义任务内容,并使用Thread 类来启动该线程。
1、传统写法
public class LambdaIntro01 {
    public static void main(String[] args) {
        new Thread(new Runnable() {
            @Override
            public void run() {
                System.out.println("启动一个线程");
            }
        }).start();
    }
}代码分析:
由于面向对象的语法要求,首先创建一个Runnable 接口的匿名内部类对象来指定线程要执行的任务内容,再将其交给一个线程来启动。
对于Runnable 的匿名内部类用法,可以分析出几点内容:
- Thread 类需要Runnable 接口作为参数,其中的抽象run 方法是用来指定线程任务内容的核心
- 为了指定run 的方法体,不得不需要Runnable 接口的实现类
- 为了省去定义一个Runnable 实现类的麻烦,不得不使用匿名内部类
- 必须覆盖重写抽象run 方法,所以方法名称、方法参数、方法返回值不得不再写一遍,且不能写错
- 而实际上,似乎只有方法体才是关键所在。
2、lambda写法
Lambda是一个匿名函数,可以理解为一段可以传递的代码。
public class LambdaIntro01 {
    public static void main(String[] args) {
        new Thread(() ->{
            System.out.println("启动一个线程");
        }).start();
    }
}代码分析:
这段代码和刚才的执行效果是完全一样的,可以在JDK 8或更高的编译级别下通过。从代码的语义中可以看出:我们启动了一个线程,而线程任务的内容以一种更加简洁的形式被指定。
我们只需要将要执行的代码放到一个Lambda表达式中,不需要定义类,不需要创建对象。
2、Lambda的标准格式
1、格式
Lambda省去面向对象的条条框框,Lambda的标准格式格式由3个部分组成:
(参数类型 参数名称) -> {
	代码体;
}格式说明:
(参数类型 参数名称):参数列表
{代码体;}:方法体
-> :箭头,分隔参数列表和方法体
2、无参数无返回值的Lambda
public interface PhoneStore {
    public abstract void buy();
}
public class LambdaUse02 {
public static void main(String[] args) {
goStore(new PhoneStore() {
@Override
public void buy() {
System.out.println("买华为手机");
}
});
goStore(() -> System.out.println("买小米手机"));
}
public static void goStore(PhoneStore phoneStore){
phoneStore.buy();
}
}3、有参数有返回值的Lambda
下面举例演示
java.util.Comparator<T>接口的使用场景代码,其中的抽象方法定义为:public abstract int compare(T o1, T o2);当需要对一个对象集合进行排序时, Collections.sort 方法需要一个Comparator 接口实例来指定排序的规则。
实体类
public class Person {

    private String name;

    private Integer age;

    private Date birthday;

    public Person(String name, Integer age, Date birthday) {
        this.name = name;
        this.age = age;
        this.birthday = birthday;
    }

    public String getName() {
        return name;
    }

    public void setName(String name) {
        this.name = name;
    }

    public Integer getAge() {
        return age;
    }

    public void setAge(Integer age) {
        this.age = age;
    }

    public Date getBirthday() {
        return birthday;
    }

    public void setBirthday(Date birthday) {
        this.birthday = birthday;
    }

    @Override
    public String toString() {
        return new StringJoiner(", ", Person.class.getSimpleName() + "[", "]")
                .add("name='" + name + "'")
                .add("age=" + age)
                .add("birthday=" + birthday)
                .toString();
    }
}
传统写法VS Lambda写法
传统写法
public class Lambda03 {
    public static void main(String[] args) {
        ArrayList<Person> persons = new ArrayList<>();
        persons.add(new Person("刘德华", 58, new Date()));
        persons.add(new Person("张学友", 58, new Date()));
        persons.add(new Person("刘德华", 54, new Date()));
        persons.add(new Person("黎明", 53, new Date()));

        Collections.sort(persons, new Comparator<Person>() {
            @Override
            public int compare(Person o1, Person o2) {
                return o1.getAge() - o2.getAge();
            }
        });

        for (Person person : persons) {
            System.out.println(person);
        }
    }
}
Lambda写法
public class Lambda03 {
    public static void main(String[] args) {
        ArrayList<Person> persons = new ArrayList<>();
        persons.add(new Person("刘德华", 58, new Date()));
        persons.add(new Person("张学友", 58, new Date()));
        persons.add(new Person("刘德华", 54, new Date()));
        persons.add(new Person("黎明", 53, new Date()));

        Collections.sort(persons,(o1, o2)->{
            return o1.getAge() - o2.getAge();
        });
        //另一种写法
        Collections.sort(persons, Comparator.comparingInt(Person::getAge));

        for (Person person : persons) {
            System.out.println(person);
        }
    }
}
3、省略格式
在Lambda标准格式的基础上,使用省略写法的规则为:
- 小括号内参数的类型可以省略
- 如果小括号内有且仅有一个参数,则小括号可以省略
- 如果大括号内有且仅有一个语句,可以同时省略大括号、return关键字及语句分号
(int a) ->{
    return new Person();
}
省略后
a -> new Person();4、前提条件
Lambda的语法非常简洁,但是Lambda表达式不是随便使用的,使用时有几个条件要特别注意:
- 方法的参数或局部变量类型必须为接口才能使用Lambda
- 接口中有且仅有一个抽象方法
public interface Flyable {

    public abstract void flying();
}
public class Lambda04 {
public static void main(String[] args) {
test(() ->{});
Flyable flyable = new Flyable() {
@Override
public void flying() {
}
};
Flyable flyable1 = () ->{
};
}
public static void test(Flyable flyable){
flyable.flying();
}
}5、函数式接口
函数式接口在Java中是指:有且仅有一个抽象方法的接口。
函数式接口,即适用于函数式编程场景的接口。而Java中的函数式编程体现就是Lambda,所以函数式接口就是可以适用于Lambda使用的接口。只有确保接口中有且仅有一个抽象方法,Java中的Lambda才能顺利地进行推导。
FunctionalInterface注解
与@Override 注解的作用类似,Java 8中专门为函数式接口引入了一个新的注解: @FunctionalInterface 。该注解可用于一个接口的定义上:
@FunctionalInterface
public interface Operator {
    void myMethod();
}
一旦使用该注解来定义接口,编译器将会强制检查该接口是否确实有且仅有一个抽象方法,否则将会报错。不过,即使不使用该注解,只要满足函数式接口的定义,这仍然是一个函数式接口,使用起来都一样。
6、Lambda和匿名内部类对比
| 不同 | Lambda | 匿名内部类 |
|---|---|---|
| 所需的类型 | 需要的类型必须是接口 | 需要的类型可以是类,抽象类,接口 |
| 抽象方法的数量 | 所需的接口只能有一个抽象方法 | 所需的接口中抽象方法的数量随意 |
| 实现原理 | 是在程序运行的时候动态生成class | 是在编译后会形成class |
总结:当接口中只有一个抽象方法时,建议使用Lambda表达式,其他其他情况还是需要使用匿名内部类
2、接口静态方法
interface 接口名 {
    修饰符 static 返回值类型 方法名() {
        代码;
    }
}
1、接口静态方法的使用
直接使用接口名调用即可:接口名.静态方法名();
public class UseStaticFunction05 {

    public static void main(String[] args) {
        A.test();
    }

    interface A{
        public static void test(){
            System.out.println("接口静态方法");
        }
    }

    class B implements A{
        //静态方法不能重写
    }
}
2、接口默认方法和静态方法的区别
- 默认方法通过实例调用,静态方法通过接口名调用。
- 默认方法可以被继承,实现类可以直接使用接口默认方法,也可以重写接口默认方法。
- 静态方法不能被继承,实现类不能重写接口静态方法,只能使用接口名调用。
3、总结
如何选择默认方法和静态方法?
如果这个方法需要被实现类继承或者重写,则使用默认方法;不需要被继承就是用静态方法
3、内置函数式接口
1、函数式接口的由来
我们知道使用Lambda表达式的前提是需要有函数式接口。而Lambda使用时不关心接口名,抽象方法名,只关心抽象方法的参数列表和返回值类型。因此为了让我们使用Lambda方便,JDK提供了大量常用的函数式接口。
public class UserFunctionalInterface06 {

    public static void main(String[] args) {
        method((arr -> {
            int sum = 0;
            for (int i : arr) {
                sum += i;
            }
            return sum;
        }));
    }


    public static void method(Operator operator){
        int[] arr = {1, 3, 4, 5};
        int sum = operator.getSum(arr);
        System.out.println("sum = " + sum);
    }

    interface Operator{
        public abstract int getSum(int[] arr);
    }
}
2、常用内置函数式接口
它们主要在java.util.function 包中
Supplier接口
@FunctionalInterface
public interface Supplier<T> {
    public abstract T get();
}
Consumer接口
@FunctionalInterface
public interface Consumer<T> {
    public abstract void accept(T t);
}
Function接口
@FunctionalInterface
public interface Function<T, R> {
    public abstract R apply(T t);
}
Predicate接口
@FunctionalInterface
public interface Predicate<T> {
    public abstract boolean test(T t);
}
//Predicate接口用于做判断,返回boolean类型的值
1、Supplier接口
java.util.function.Supplier<T>接口,它意味着"供给" , 对应的Lambda表达式需要“对外提供”一个符合泛型类型的对象数据。
@FunctionalInterface
public interface Supplier<T> {
    public abstract T get();
}
供给型接口,通过Supplier接口中的get方法可以得到一个值,无参有返回的接口。
使用Lambda表达式返回数组元素最大值
public class SupplierDemo07 {

    public static void main(String[] args) {
        getMax(() ->{
            int[] arr = {10,20,99,100,1001,1004};
            Arrays.sort(arr);
            return arr[arr.length - 1];
        });
    }

    private static void getMax(Supplier<Integer> supplier){
        Integer max = supplier.get();
        System.out.println("max = " + max);
    }
}
2、Consumer接口
java.util.function.Consumer<T>接口则正好相反,它不是生产一个数据,而是消费一个数据,其数据类型由泛型参数决定。
@FunctionalInterface
public interface Consumer<T> {
    public abstract void accept(T t);
}
使用Lambda表达式将一个字符串转成大写和小写的字符串
Consumer消费型接口,可以拿到accept方法参数传递过来的数据进行处理, 有参无返回的接口。基本使用如:
public class ConsumerDemo08 {

    public static void main(String[] args) {
        test((String s) ->{
            System.out.println(s.toUpperCase(Locale.ROOT));
        });
    }

    public static void test(Consumer<String> comsumer){
        comsumer.accept("hello xiaobear");
    }
}
默认方法:andThen
如果一个方法的参数和返回值全都是Consumer 类型,那么就可以实现效果:消费一个数据的时候,首先做一个操作,然后再做一个操作,实现组合。而这个方法就是Consumer 接口中的default方法andThen 。下面是JDK的源代码:
default Consumer<T> andThen(Consumer<? super T> after) {
    Objects.requireNonNull(after);
    return (T t) -> { accept(t); after.accept(t); };
}
备注: java.util.Objects 的requireNonNull 静态方法将会在参数为null时主动抛出NullPointerException 异常。这省去了重复编写if语句和抛出空指针异常的麻烦。
要想实现组合,需要两个或多个Lambda表达式即可,而andThen 的语义正是“一步接一步”操作。例如两个步骤组合的情况:
public class ConsumerAndThen09 {

    public static void main(String[] args) {
        //lambda表达式
        test((String s) ->{
            System.out.println(s.toUpperCase(Locale.ROOT));
        }, (String s) ->{
            System.out.println(s.toLowerCase(Locale.ROOT));
        });
        //简写
        test(s ->{
            System.out.println(s.toUpperCase(Locale.ROOT));
        }, s ->{
            System.out.println(s.toLowerCase(Locale.ROOT));
        });
    }

    public static void test(Consumer<String> c1, Consumer<String> c2){
        String str = "hello world";
        c1.andThen(c2).accept(str);
        c2.andThen(c1).accept(str);
    }
}
3、Function接口
java.util.function.Function<T,R>接口用来根据一个类型的数据得到另一个类型的数据,前者称为前置条件,后者称为后置条件。有参数有返回值。
@FunctionalInterface
public interface Function<T, R> {
    public abstract R apply(T t);
}
使用Lambda表达式将字符串转成数字
Function转换型接口,对apply方法传入的T类型数据进行处理,返回R类型的结果,有参有返回的接口。使用的场景
例如:将String 类型转换为Integer 类型。
public class Function10 {

    public static void main(String[] args) {
        test(s -> {
            return Integer.parseInt(s);
        });
        //简写
        test(Integer::parseInt);
    }

    public static void test(Function<String, Integer> func){
        Integer apply = func.apply("10");
        System.out.println(apply);
    }
}
默认方法:andThen
Function 接口中有一个默认的andThen 方法,用来进行组合操作。JDK源代码如:
default <V> Function<T, V> andThen(Function<? super R, ? extends V> after) {
    Objects.requireNonNull(after);
    return (T t) -> after.apply(apply(t));
}
该方法同样用于“先做什么,再做什么”的场景,和Consumer 中的andThen 差不多:
public class FunctionAndThen11 {

    public static void main(String[] args) {
        test(Integer::parseInt, integer -> {
            return integer * 10;
        });
    }

    public static void test(Function<String, Integer> f1, Function<Integer, Integer> f2){
        Integer apply = f1.andThen(f2).apply("66");
        System.out.println(apply);
    }
}
第一个操作是将字符串解析成为int数字,第二个操作是乘以10。两个操作通过andThen 按照前后顺序组合到了一起。
请注意,Function的前置条件泛型和后置条件泛型可以相同。
4、Predicate接口
有时候我们需要对某种类型的数据进行判断,从而得到一个boolean值结果。这时可以使用
java.util.function.Predicate<T>接口。
@FunctionalInterface
public interface Predicate<T> {
    public abstract boolean test(T t);
}
//Predicate接口用于做判断,返回boolean类型的值
使用Lambda判断一个人名如果超过3个字就认为是很长的名字
对test方法的参数T进行判断,返回boolean类型的结果。用于条件判断的场景:
public class Predicate12 {

    public static void main(String[] args) {
        test(s -> s.length() > 3,"华总的小熊");
    }

    public static void test(Predicate<String> predicate, String str){
        boolean test = predicate.test(str);
        System.out.println("你爱她吗:" + test);
    }
}
条件判断的标准是传入的Lambda表达式逻辑,只要名称长度大于3则认为很长。
默认方法:and
既然是条件判断,就会存在与、或、非三种常见的逻辑关系。其中将两个Predicate 条件使用“与”逻辑连接起来实
现“并且”的效果时,可以使用default方法and 。其JDK源码为:
default Predicate<T> and(Predicate<? super T> other) {
    Objects.requireNonNull(other);
    return (t) -> test(t) && other.test(t);
}
测试内容:
使用Lambda表达式判断一个字符串中即包含W,也包含H
使用Lambda表达式判断一个字符串中包含W或者包含H
使用Lambda表达式判断一个字符串中即不包含W
如果要判断一个字符串既要包含大写“H”,又要包含大写“W”
public class Predicate_And_Or_Negate13 {

    public static void main(String[] args) {
        test(s -> s.contains("H"),s -> s.contains("W"));
    }

    public static void test(Predicate<String> p1, Predicate<String> p2) {
        String str = "HelloWorld";
        boolean b1 = p1.test(str); // 判断包含大写“H”
        boolean b2 = p2.test(str); // 判断包含大写“W”
        if (b1 && b2) {
            System.out.println("即包含W,也包含H");
        }
        boolean bb = p1.and(p2).test(str);
        if (bb) {
            System.out.println("即包含W,也包含H");
        }
    }
}
默认方法:or
使用Lambda表达式判断一个字符串中包含W或者包含H
与and 的“与”类似,默认方法or 实现逻辑关系中的“或”。JDK源码为:
default Predicate<T> or(Predicate<? super T> other) {
    Objects.requireNonNull(other);
    return (t) -> test(t) || other.test(t);
}
如果希望实现逻辑“字符串包含大写H或者包含大写W”,那么代码只需要将“and”修改为“or”名称即可,其他都不变:
public class Predicate_And_Or_Negate13 {

    public static void main(String[] args) {
        test1(s -> s.contains("H"),s -> s.contains("W"));
    }

    public static void test1(Predicate<String> p1, Predicate<String> p2){
        String str = "HelloWorld";
        boolean b1 = p1.test(str); // 判断包含大写“H”
        boolean b2 = p2.test(str); // 判断包含大写“W”
        if (b1 || b2){
            System.out.println("有H,或者W");
        }
        boolean test = p1.or(p2).test(str);
        if(test){
            System.out.println("有H,或者W");
        }
    }
}
默认方法:negate
使用Lambda表达式判断一个字符串中即不包含W
“与”、“或”已经了解了,剩下的“非”(取反)也会简单。默认方法negate 的JDK源代码为:
default Predicate<T> negate() {
    return (t) -> !test(t);
}
从实现中很容易看出,它是执行了test方法之后,对结果boolean值进行“!”取反而已。一定要在test 方法调用之前调用negate 方法,正如and 和or 方法一样:
public class Predicate_And_Or_Negate13 {

    public static void main(String[] args) {
        test2(s -> s.contains("H"),s -> s.contains("W"));
    }

    public static void test2(Predicate<String> p1, Predicate<String> p2){
        String str = "HelloWorld";
        boolean b1 = p1.test(str); // 判断包含大写“H”
        boolean b2 = p2.test(str); // 判断包含大写“W”
        if (!b1){
            System.out.println("没有H");
        }
        boolean test = p1.negate().test(str);
        if (test){
            System.out.println("没有H");
        }
    }
}
4、引用
1、方法引用
符号表示 :
::符号说明 : 双冒号为方法引用运算符,而它所在的表达式被称为方法引用。
应用场景 : 如果Lambda所要实现的方案 , 已经有其他方法存在相同方案,那么则可以使用方法引用。
2、常见的引用方式
instanceName::methodName对象::方法名
ClassName::staticMethodName类名::静态方法
ClassName::methodName类名::普通方法
ClassName::new类名::new 调用的构造器
TypeName[]::new String[]::new调用数组的构造器
3、对象::方法名
这是最常见的一种用法,与上例相同。如果一个类中已经存在了一个成员方法,则可以通过对象名引用成员方法,代码为:
public class Quote01 {

    public static void main(String[] args) {
        Date date = new Date();
        Supplier<Long> longCallable = () -> date.getTime();
        System.out.println(longCallable.get());
        //对象::实例方法
        Supplier<Long> time = date::getTime;
        System.out.println(time.get());
    }
}
方法引用的注意事项
- 被引用的方法,参数要和接口中抽象方法的参数一样
- 当接口抽象方法有返回值时,被引用的方法也必须有返回值
4、类名::引用静态方法
由于在java.lang.System 类中已经存在了静态方法currentTimeMillis ,所以当我们需要通过Lambda来调用该方法时,可以使用方法引用 , 写法是:
public class Quote02 {

    public static void main(String[] args) {
        Supplier<Long> time = () -> System.currentTimeMillis();
        System.out.println(time.get());
        //类名::静态方法
        Supplier<Long> timeMillis = System::currentTimeMillis;
        System.out.println(timeMillis.get());
    }
}
5、类名::引用实例方法
Java面向对象中,类名只能调用静态方法,类名引用实例方法是有前提的,实际上是拿第一个参数作为方法的调用者。
public class Quote03 {

    public static void main(String[] args) {
        Function<String, Integer> f1 = (s) -> {
            return s.length();
        };
        System.out.println(f1.apply("abc"));

        Function<String, Integer> f2 = String::length;
        System.out.println(f2.apply("def"));

        BiFunction<String, Integer, String> bif = String::substring;
        String hello = bif.apply("hello", 2);
        System.out.println("hello = " + hello);
    }
}
6、类名::new引用构造器
由于构造器的名称与类名完全一样。所以构造器引用使用类名称::new 的格式表示。首先是一个简单的Person 类:
public class Quote04 {

    public static void main(String[] args) {
        Supplier<Person> person = () -> {
            return new Person();
        };
        System.out.println(person.get());
        Supplier<Person> person1 = Person::new;
        System.out.println(person1.get());

    }
}
7、数组::new 引用数组构造器
数组也是Object 的子类对象,所以同样具有构造器,只是语法稍有不同。
public class Quote05 {

    public static void main(String[] args) {
        Function<Integer, String[]> fun = (len) -> {
            return new String[len];
        };
        String[] arr1 = fun.apply(10);
        System.out.println(arr1 + ", " + arr1.length);
        Function<Integer, String[]> fun2 = String[]::new;
        String[] arr2 = fun.apply(5);
        System.out.println(arr2 + ", " + arr2.length);
    }
}
总结
方法引用是对Lambda表达式符合特定情况下的一种缩写,它使得我们的Lambda表达式更加的精简,也可以理解为Lambda表达式的缩写形式 , 不过要注意的是方法引用只能"引用"已经存在的方法!
5、Stream流
1、思想概述
Stream和IO流(InputStream/OutputStream)没有任何关系,请暂时忘记对传统IO流的固有印象!
Stream流式思想类似于工厂车间的“生产流水线”,Stream流不是一种数据结构,不保存数据,而是对数据进行加工处理。Stream可以看作是流水线上的一个工序。在流水线上,通过多个工序让一个原材料加工成一个商品。
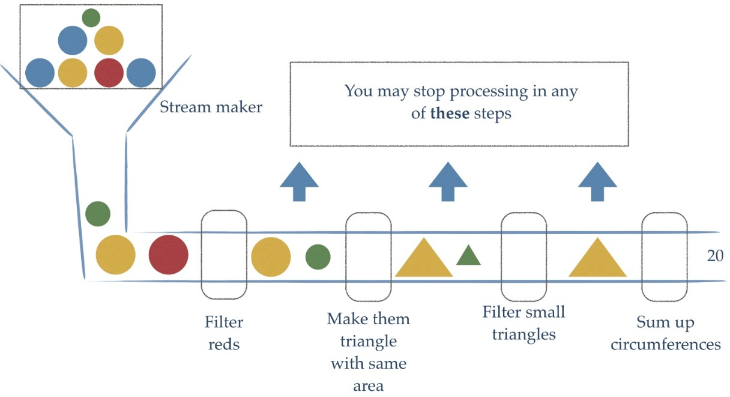
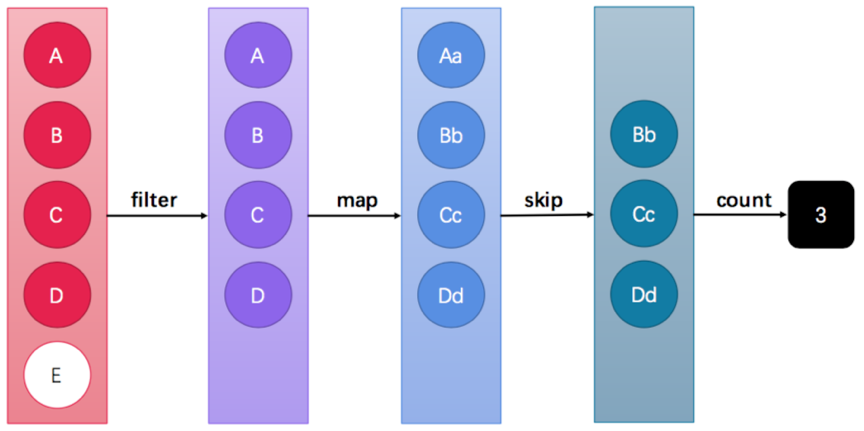
Stream API能让我们快速完成许多复杂的操作,如筛选、切片、映射、查找、去除重复,统计,匹配和归约。
2、获取流的两种方式
java.util.stream.Stream<T>是JDK 8新加入的流接口。
- 所有的Collection 集合都可以通过stream 默认方法获取流;
- Stream 接口的静态方法of 可以获取数组对应的流。
1、根据Collection获取流
首先, java.util.Collection 接口中加入了default方法stream 用来获取流,所以其所有实现类均可获取流。
public class GetStream01 {

    public static void main(String[] args) {
        ArrayList<String> list = new ArrayList<>();
        Stream<String> stream = list.stream();

        Set<String> set = new HashSet<>();
        Stream<String> stream2 = set.stream();

        Vector<String> vector = new Vector<>();
        Stream<String> stream3 = vector.stream();

        // Map获取流
        Map<String, String> map = new HashMap<>();
        //java.util.Map 接口不是Collection 的子接口,所以获取对应的流需要分key、value或entry等情况
        Stream<String> keyStream = map.keySet().stream();
        Stream<String> valueStream = map.values().stream();
        Stream<Map.Entry<String, String>> entryStream = map.entrySet().stream();

    }
}
2、Stream中的静态方法of获取流
由于数组对象不可能添加默认方法,所以Stream 接口中提供了静态方法of ,使用很简单。
public class GetStream02 {

    public static void main(String[] args) {
        // Stream中的静态方法: static Stream of(T... values)

        Stream<String> stringStream = Stream.of("aa", "bb", "cc");
        String[] arr = {"aa", "bb", "cc"};
        Stream<String> stream7 = Stream.of(arr);
        Integer[] arr2 = {11, 22, 33};
        Stream<Integer> stream8 = Stream.of(arr2);
        // 注意:基本数据类型的数组不行
        int[] arr3 = {11, 22, 33};
        Stream<int[]> stream9 = Stream.of(arr3);
    }
}
备注: of 方法的参数其实是一个可变参数,所以支持数组。
3、Stream常用方法和注意事项
1、常用用法
Stream流模型的操作很丰富,这里介绍一些常用的API。这些方法可以被分成两种:
| 方法名 | 方法作用 | 返回值类型 | 方法种类 |
|---|---|---|---|
| count | 统计个数 | long | 终结 |
| forEach | 逐个处理 | void | 终结 |
| filter | 过滤 | Stream | 函数拼接 |
| limit | 取前几个 | Stream | 函数拼接 |
| skip | 跳过前几个 | Stream | 函数拼接 |
| map | 映射 | Stream | 函数拼接 |
| concat | 组合 | Stream | 函数拼接 |
- 终结方法:返回值类型不再是Stream 类型的方法,不再支持链式调用。本小节中,终结方法包括count 和forEach 方法。
- 非终结方法:返回值类型仍然是Stream 类型的方法,支持链式调用。(除了终结方法外,其余方法均为非终结方法。)
2、注意事项
Stream只能操作一次
Stream方法返回的是新的流
Stream不调用终结方法,中间的操作不会执行
3、forEach方法
forEach 用来遍历流中的数据
void forEach(Consumer<? super T> action);该方法接收一个Consumer 接口函数,会将每一个流元素交给该函数进行处理。例如:
public class StreamMethodForEach {

    public static void main(String[] args) {
        List<String> one = new ArrayList<>();
        Collections.addAll(one, "迪丽热巴", "宋远桥", "苏星河", "老子", "庄子", "孙子");

        one.forEach(System.out::println);

    }
}
4、count方法
Stream流提供count 方法来统计其中的元素个数
long count();该方法返回一个long值代表元素个数。基本使用:
public class StreamMethodCount {
    public static void main(String[] args) {
        List<String> one = new ArrayList<>();
        Collections.addAll(one, "迪丽热巴", "宋远桥", "苏星河", "老子", "庄子", "孙子");
        System.out.println(one.stream().count());
    }
}
5、filter方法
filter用于过滤数据,返回符合过滤条件的数据
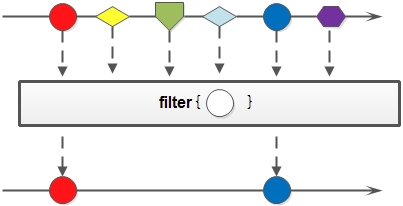
可以通过filter 方法将一个流转换成另一个子集流。方法声明:
Stream<T> filter(Predicate<? super T> predicate);该接口接收一个Predicate 函数式接口参数(可以是一个Lambda或方法引用)作为筛选条件。
Stream流中的filter 方法基本使用的代码如:
public class StreamMethodFilter {

    public static void main(String[] args) {
        List<String> one = new ArrayList<>();
        Collections.addAll(one, "迪丽热巴", "宋远桥", "苏星河", "老子", "庄子", "孙子");
        //筛选出姓名长度为2个字。
        one.stream().filter(o -> 2 == o.length()).forEach(System.out::println);
    }
6、limit方法
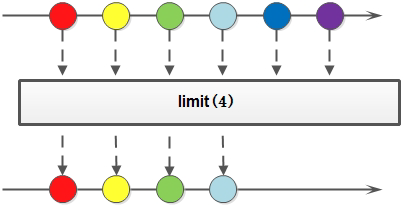
limit 方法可以对流进行截取,只取用前n个。
Stream<T> limit(long maxSize);参数是一个long型,如果集合当前长度大于参数则进行截取。否则不进行操作。基本使用:
public class StreamMethodLimit {

    public static void main(String[] args) {
        List<String> one = new ArrayList<>();
        Collections.addAll(one, "迪丽热巴", "宋远桥", "苏星河", "老子", "庄子", "孙子");
        //筛选出姓名为2个字,并且取出前两个并打印
        one.stream().filter(o -> 2 == o.length()).limit(2).forEach(System.out::println);
    }
}
7、skip方法
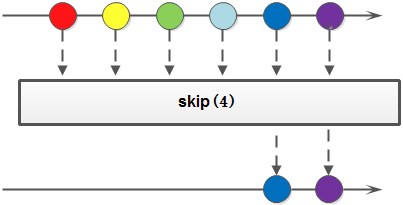
如果希望跳过前几个元素,可以使用skip 方法获取一个截取之后的新流:
Stream<T> skip(long n);如果流的当前长度大于n,则跳过前n个;否则将会得到一个长度为0的空流。基本使用:
public class StreamMethodSkip {

    public static void main(String[] args) {
        List<String> one = new ArrayList<>();
        Collections.addAll(one, "迪丽热巴", "宋远桥", "苏星河", "老子", "庄子", "孙子");
        //筛选出姓名为2个字,并且取出前两个然后跳过第一个并打印
        one.stream().filter(o -> 2 == o.length()).limit(2).skip(1).forEach(System.out::println);
    }

}
8、map方法
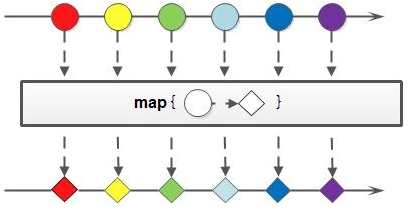
如果需要将流中的元素映射到另一个流中,可以使用map 方法。方法签名:
<R> Stream<R> map(Function<? super T, ? extends R> mapper);该接口需要一个Function 函数式接口参数,可以将当前流中的T类型数据转换为另一种R类型的流。
public class StreamMethodMap {

    public static void main(String[] args) {
        Stream<String> original = Stream.of("11", "22", "33");
        Stream<Integer> result = original.map(Integer::parseInt);
        result.forEach(s -> System.out.println(s + 10));
    }
}
9、sorted方法
如果需要将数据排序,可以使用sorted 方法。
Stream<T> sorted();
Stream<T> sorted(Comparator<? super T> comparator);
sorted 方法根据元素的自然顺序排序,也可以指定比较器排序。
public class StreamMethodSort {

    public static void main(String[] args) {
        Stream.of(33, 22, 11, 55)
                .sorted()
                .sorted((o1, o2) -> o2 - o1)
                .forEach(System.out::println);
    }
}
10、distinct方法
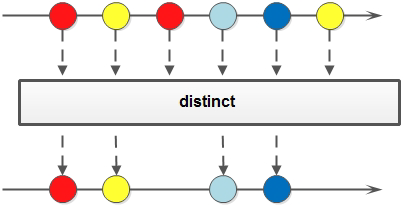
如果需要去除重复数据,可以使用distinct 方法。方法签名:
Stream<T> distinct();public class StreamMethodDistinct {
public static void main(String[] args) {
//去重并排序
Stream.of(22, 33, 22, 11, 33)
.distinct()
.sorted(((o1, o2) -> o2 - o1))
.forEach(System.out::println);
}
}11、match方法
如果需要判断数据是否匹配指定的条件,可以使用Match 相关方法。
boolean allMatch(Predicate<? super T> predicate);
boolean anyMatch(Predicate<? super T> predicate);
boolean noneMatch(Predicate<? super T> predicate);
public class StreamMethodMatch {
public static void main(String[] args) {
boolean b = Stream.of(5, 3, 6, 1)
// allMatch: 元素是否全部满足条件
// .allMatch(e -> e > 0);
// anyMatch: 元素是否任意有一个满足条件
// .anyMatch(e -> e > 5);
.noneMatch(e -> e < 0); // noneMatch: 元素是否全部不满足条件
System.out.println("b = " + b);
}
}12、find方法
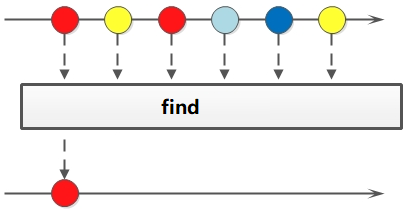
如果需要找到某些数据,可以使用find 相关方法。
Optional<T> findFirst();
Optional<T> findAny();
public class StreamMethodFind {
public static void main(String[] args) {
Optional<Integer> first = Stream.of(5, 3, 6, 1).findFirst();
System.out.println("first = " + first.get());
Optional<Integer> any = Stream.of(5, 3, 6, 1).findAny();
System.out.println("any = " + any.get());
}
}13、max和min方法
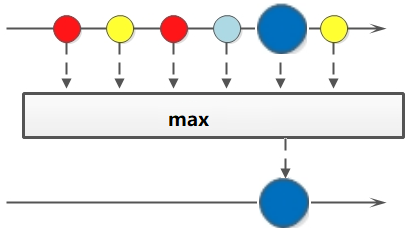
如果需要获取最大和最小值,可以使用max 和min 方法。
Optional<T> max(Comparator<? super T> comparator);
Optional<T> min(Comparator<? super T> comparator);
public class StreamMethodMaxAndMin {
public static void main(String[] args) {
Optional<Integer> max = Stream.of(5, 3, 6, 1).max(Comparator.comparingInt(o -> o));
System.out.println("first = " + max.get());
Optional<Integer> min = Stream.of(5, 3, 6, 1).min(Comparator.comparingInt(o -> o));
System.out.println("any = " + min.get());
}
}14、reduce方法

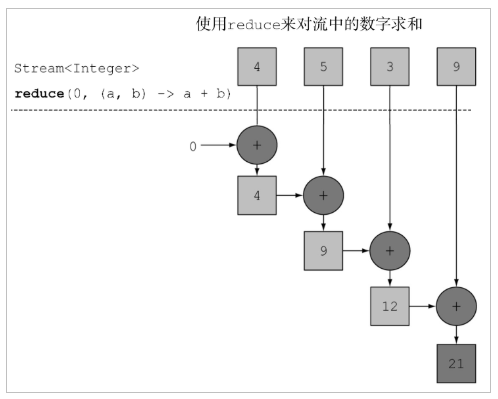
如果需要将所有数据归纳得到一个数据,可以使用reduce 方法。
T reduce(T identity, BinaryOperator<T> accumulator);public class StreamMethodReduce {
public static void main(String[] args) {
int reduce = Stream.of(4, 5, 3, 9)
.reduce(0, (a, b) -> {
System.out.println("a = " + a + ", b = " + b);
return a + b;
});
// reduce:
// 第一次将默认做赋值给x, 取出第一个元素赋值给y,进行操作
// 第二次,将第一次的结果赋值给x, 取出二个元素赋值给y,进行操作
// 第三次,将第二次的结果赋值给x, 取出三个元素赋值给y,进行操作
// 第四次,将第三次的结果赋值给x, 取出四个元素赋值给y,进行操作
System.out.println("reduce = " + reduce);
int reduce2 = Stream.of(4, 5, 3, 9)
.reduce(0, Integer::sum);
System.out.println("reduce2 = " + reduce2);
int reduce3 = Stream.of(4, 5, 3, 9).reduce(0, Integer::sum);
int max = Stream.of(4, 5, 3, 9)
.reduce(0, (x, y) -> x > y ? x : y);
System.out.println("max = " + max);
}
}
15、map和reduce的组合使用
public class StreamMethodReduceAndMap {
    public static void main(String[] args) {
        Stream<Person> personStream = Stream.of(
                new Person("1111", 18, new Date()),
                new Person("2222", 19, new Date()),
                new Person("33333", 20, new Date()),
                new Person("4444", 21, new Date()));
        Integer totalAge = personStream.map(Person::getAge).reduce(0, (x, y) -> x + y);
        System.out.println("总年龄为:" + totalAge);

        Integer maxAge = personStream.map(Person::getAge).reduce(0, (x, y) -> x > y ? x : y);
        System.out.println("最大年龄为:" + maxAge);


    }
}
16、mapToInt方法
如果需要将Stream中的Integer类型数据转成int类型,可以使用mapToInt 方法。方法签名:
IntStream mapToInt(ToIntFunction<? super T> mapper);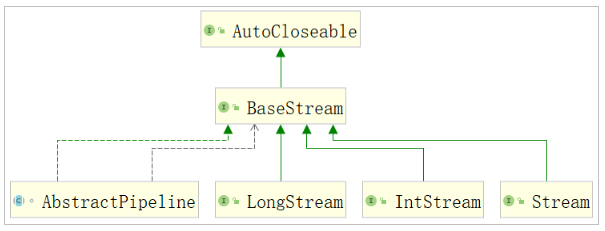
public class StreamMethodMapToInt {

    public static void main(String[] args) {
        Stream<Integer> stream = Arrays.stream(new Integer[]{1, 2, 3, 4, 5});
        //注释的原因是因为流只能使用一次
//        System.out.println(stream.filter(o -> o > 3)
//                .reduce(0, Integer::sum));

        IntStream intStream = stream.mapToInt(Integer::intValue);
//        System.out.println(intStream.filter(o -> o < 3)
//                .reduce(0, Integer::sum));
        System.out.println(intStream.filter(o -> o > 3).summaryStatistics().getSum());
    }
}
17、concat方法
如果有两个流,希望合并成为一个流,那么可以使用Stream 接口的静态方法concat :
static <T> Stream<T> concat(Stream<? extends T> a, Stream<? extends T> b)这是一个静态方法,与java.lang.String 当中的concat 方法是不同的。
public class StreamMethodConcat {
    public static void main(String[] args) {
        Stream<String> stringStream = Stream.of("1111");
        Stream<String> stringStream1 = Stream.of("2222");
        Stream<String> concat = Stream.concat(stringStream, stringStream1);
        concat.forEach(System.out::println);
    }
}
4、收集流中的结果
1、收集到数组中
Stream提供toArray 方法来将结果放到一个数组中,返回值类型是Object[]的:
Object[] toArray();public class StreamToArray {
public static void main(String[] args) {
Stream<String> aa = Stream.of("aa", "bb", "cc");
// Object[] toArray = aa.toArray();
// for (Object o : toArray) {
// System.out.println(o);
// }
String[] strings = aa.toArray(String[]::new);
for (String s : strings) {
System.out.println(s);
}
}
}2、收集到集合中
Stream流提供collect 方法,其参数需要一个java.util.stream.Collector<T,A, R> 接口对象来指定收集到哪种集合中。java.util.stream.Collectors 类提供一些方法,可以作为Collector`接口的实例:
public static <T> Collector<T, ?, List<T>> toList():转换为List 集合。public static <T> Collector<T, ?, Set<T>> toSet():转换为Set 集合。
public class StreamToCollection {

    public static void main(String[] args) {
        Stream<String> stream = Stream.of("11", "22", "11");
        List<String> list = stream.collect(Collectors.toList());
        list.forEach(System.out::println);
        Set<String> set = stream.collect(Collectors.toSet());
        set.forEach(System.out::println);

        ArrayList<String> list1 = stream.collect(Collectors.toCollection(ArrayList::new));
        HashSet<String> set1 = stream.collect(Collectors.toCollection(HashSet::new));
    }
}
3、对流中数据进行聚合计算
当我们使用Stream流处理数据后,可以像数据库的聚合函数一样对某个字段进行操作。比如获取最大值,获取最小值,求总和,平均值,统计数量。
public class StreamToOther {

    public static void main(String[] args) {
        Stream<Integer> stream = Stream.of(12, 16, 15, 86, 35, 54, 76, 54);
        IntSummaryStatistics statistics = stream.mapToInt(Integer::intValue).summaryStatistics();
        //获取最大值
        int max = statistics.getMax();
        double average = statistics.getAverage();
        int min = statistics.getMin();
        long sum = statistics.getSum();
    }
}
4、对数据进行分组
public class StreamToGroup {

    public static void main(String[] args) {
        Stream<Person> personStream = Stream.of(
                new Person("1111", 18, new Date()),
                new Person("2222", 19, new Date()),
                new Person("33333", 20, new Date()),
                new Person("4444", 21, new Date()));

        //Map<Integer, List<Person>> map = personStream.collect(Collectors.groupingBy(Person::getAge));

        Map<String, List<Person>> map1 = personStream.collect(Collectors.groupingBy((s) -> {
            if (s.getAge() > 18) {
                return "成年了";
            } else {
                return "刚好成年";
            }
        }));

        map1.forEach((k,v) ->{
            System.out.println(k + "::" + v);
        });
    }
5、对流中数据进行多级分组
public class StreamToGradeGrouping {

    public static void main(String[] args) {
        Stream<Person> personStream = Stream.of(
                new Person("1111", 18, new Date()),
                new Person("2222", 19, new Date()),
                new Person("33333", 20, new Date()),
                new Person("4444", 21, new Date()));

        //现根据年龄进行分组,再根据年龄大小进行分组
        Map<Integer, Map<String, List<Person>>> mapMap = personStream.collect(Collectors.groupingBy(s -> s.getAge(), Collectors.groupingBy(s -> {
            if (s.getAge() > 18) {
                return "成年了";
            } else {
                return "刚好成年";
            }
        })));

        mapMap.forEach((k,v) ->{
            System.out.println(k + ":" + v);
        });
    }
}
6、对数据进行分区
Collectors.partitioningBy 会根据值是否为true,把集合分割为两个列表,一个true列表,一个false列表。

public class StreamToPartitioningBy {

    public static void main(String[] args) {
        Stream<Person> personStream = Stream.of(
                new Person("1111", 18, new Date()),
                new Person("2222", 19, new Date()),
                new Person("33333", 20, new Date()),
                new Person("4444", 21, new Date()));

        Map<Boolean, List<Person>> map = personStream.collect(Collectors.partitioningBy(s -> s.getAge() > 20));

        map.forEach((k,v) ->{
            System.out.println(k + ":" + v);
        });
    }
7、对数据进行拼接
public class StreamToJoining {

    public static void main(String[] args) {
        Stream<Person> personStream = Stream.of(
                new Person("1111", 18, new Date()),
                new Person("2222", 19, new Date()),
                new Person("33333", 20, new Date()),
                new Person("4444", 21, new Date()));

        String collect = personStream.map(Person::getName).collect(Collectors.joining(">_<", "^_^", "^v^"));
        System.out.println(collect);
    }
}
6、并行流
1、初体验
1、串行的Stream流
简单的说,就是在一个线程上执行。
public class StreamDemo1 {

    public static void main(String[] args) {
        long count = Stream.of(4, 5, 3, 9, 1, 2, 6)
                .filter(s -> {
                    System.out.println(Thread.currentThread() + ", s = " + s);
                    return true;
                })
                .count();
        System.out.println("count = " + count);
    }
}
2、并行的Stream流
parallelStream其实就是一个并行执行的流。它通过默认的ForkJoinPool,可能提高多线程任务的速度。
public class StreamDemo2 {

    public static void main(String[] args) {
        long count = Stream.of(4, 5, 3, 9, 1, 2, 6)
                .parallel()
                .filter(s -> {
                    System.out.println(Thread.currentThread() + ", s = " + s);
                    return true;
                })
                .count();
        System.out.println("count = " + count);
    }
}
获取并行流有两种方式:
- 直接获取并行流: parallelStream()
- 将串行流转成并行流: parallel()
3、并行和串行Stream流的效率对比
使用for循环,串行Stream流,并行Stream流来对5亿个数字求和。看消耗的时间。
public class StreamDemo3 {

    private static final long TIMES = 50000000000L;

    public static void main(String[] args) {
        //正常处理 for
        long startFor = System.currentTimeMillis();
        long result = 0;
        for (long i = 0; i < TIMES; i++) {
            result += i;
        }
        System.out.println("for循环执行时间:"+(System.currentTimeMillis()-startFor));
        //串行流处理时间
        long startStream = System.currentTimeMillis();
        LongStream.rangeClosed(0, TIMES).reduce(0, Long::sum);
        System.out.println("stream执行时间:"+(System.currentTimeMillis()-startStream));
        //并行流处理时间
        long startParallelStream = System.currentTimeMillis();
        LongStream.rangeClosed(0,TIMES).parallel().reduce(0,Long::sum);
        System.out.println("parallelStream执行时间:"+(System.currentTimeMillis()-startParallelStream));
    }
}
输出结果为:
for循环执行时间:13591
stream执行时间:18298
parallelStream执行时间:5039
Stream并行处理的过程会分而治之,也就是将一个大任务切分成多个小任务,这表示每个任务都是一个操作。
2、parallelStream线程安全问题
public class ParallelStreamNotice {

    public static void main(String[] args) {
        ArrayList<Integer> list = new ArrayList<Integer>();
        for (int i = 0; i < 1000; i++) {
            list.add(i);
        }
        System.out.println(list.size());
        //并行流创建
        List<Integer> newList = new ArrayList<>();
        list.parallelStream()
                .forEach(newList::add);
        System.out.println(newList.size());
    }
}
输出结构为
1000
990
我们明明是往集合中添加1000个元素,而实际上只有903个元素。
解决方法: 加锁、使用线程安全的集合或者调用Stream的toArray() / collect() 操作就是满足线程安全的了。
public class ParallelStreamNotice {

    public static void main(String[] args) {
        ArrayList<Integer> list = new ArrayList<Integer>();
        for (int i = 0; i < 1000; i++) {
            list.add(i);
        }
        System.out.println(list.size());
        //并行流创建
        List<Integer> newList = new ArrayList<>();

        //解决方法1
//        List<Integer> newList = new Vector<>();
        //解决方法2
//        list.parallelStream()
//                .forEach(newList::add);
//        System.out.println(newList.size());
//解决方法3
//        Arrays.stream(list.toArray()).forEach(o ->{
//            newList.add((Integer) o);
//        });

        newList = list.parallelStream().collect(Collectors.toList());
        System.out.println(newList.size());
    }
}
3、parallelStream背后的技术
1、Fork/Join框架介绍
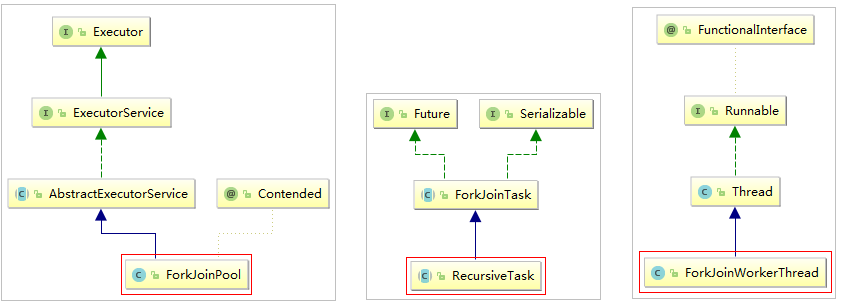
parallelStream使用的是Fork/Join框架。Fork/Join框架自JDK 7引入。Fork/Join框架可以将一个大任务拆分为很多小任务来异步执行。 Fork/Join框架主要包含三个模块:
- 线程池:ForkJoinPool
- 任务对象:ForkJoinTask
- 执行任务的线程:ForkJoinWorkerThread
2、Fork/Join原理-分治法
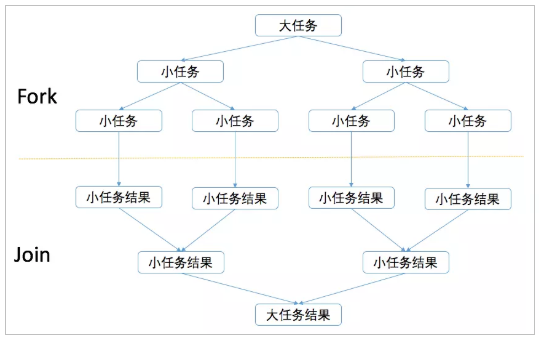
ForkJoinPool主要用来使用分治法(Divide-and-Conquer Algorithm)来解决问题。典型的应用比如快速排序算法,ForkJoinPool需要使用相对少的线程来处理大量的任务。比如要对1000万个数据进行排序,那么会将这个任务分割成两个500万的排序任务和一个针对这两组500万数据的合并任务。以此类推,对于500万的数据也会做出同样的分割处理,到最后会设置一个阈值来规定当数据规模到多少时,停止这样的分割处理。比如,当元素的数量小于10时,会停止分割,转而使用插入排序对它们进行排序。那么到最后,所有的任务加起来会有大概2000000+个。问题的关键在于,对于一个任务而言,只有当它所有的子任务完成之后,它才能够被执行。
3、Fork/Join原理-工作窃取算法
Fork/Join最核心的地方就是利用了现代硬件设备多核,在一个操作时候会有空闲的cpu,那么如何利用好这个空闲的cpu就成了提高性能的关键,而这里我们要提到的工作窃取(work-stealing)算法就是整个Fork/Join框架的核心理念Fork/Join工作窃取(work-stealing)算法是指某个线程从其他队列里窃取任务来执行。
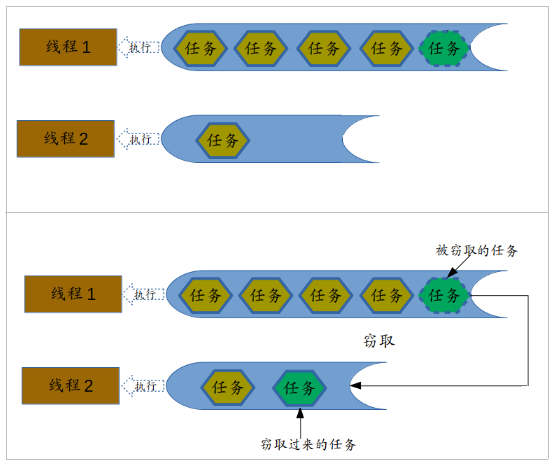
那么为什么需要使用工作窃取算法呢?假如我们需要做一个比较大的任务,我们可以把这个任务分割为若干互不依赖的子任务,为了减少线程间的竞争,于是把这些子任务分别放到不同的队列里,并为每个队列创建一个单独的线程来执行队列里的任务,线程和队列一一对应,比如A线程负责处理A队列里的任务。但是有的线程会先把自己队列里的任务干完,而其他线程对应的队列里还有任务等待处理。干完活的线程与其等着,不如去帮其他线程干活,于是它就去其他线程的队列里窃取一个任务来执行。而在这时它们会访问同一个队列,所以为了减少窃取任务线程和被窃取任务线程之间的竞争,通常会使用双端队列,被窃取任务线程永远从双端队列的头部拿任务执行,而窃取任务的线程永远从双端队列的尾部拿任务执行。
工作窃取算法的优点是充分利用线程进行并行计算,并减少了线程间的竞争,其缺点是在某些情况下还是存在竞争,比如双端队列里只有一个任务时。并且消耗了更多的系统资源,比如创建多个线程和多个双端队列。
上文中已经提到了在Java 8引入了自动并行化的概念。它能够让一部分Java代码自动地以并行的方式执行,也就是我们使用了ForkJoinPool的ParallelStream。对于ForkJoinPool通用线程池的线程数量,通常使用默认值就可以了,即运行时计算机的处理器数量。可以通过设置系统属性:java.util.concurrent.ForkJoinPool.common.parallelism=N (N为线程数量),来调整ForkJoinPool的线程数量,可以尝试调整成不同的参数来观察每次的输出结果。
4、Fork/Join案例
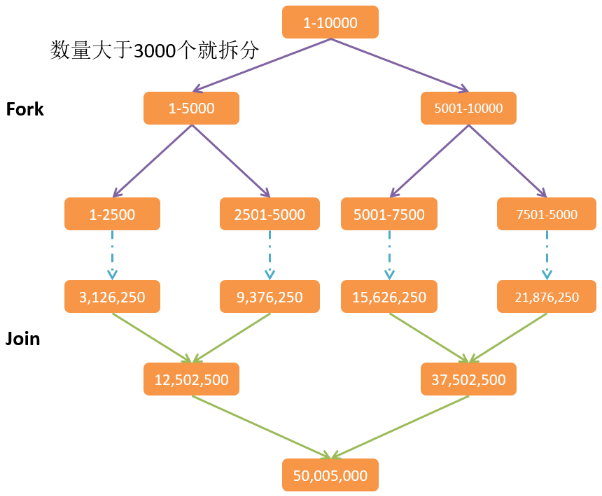
需求:使用Fork/Join计算1-10000的和,当一个任务的计算数量大于3000时拆分任务,数量小于3000时计算。
public class ForkJoinDemo4 {

    public static void main(String[] args) {
        long start = System.currentTimeMillis();
        ForkJoinPool pool = new ForkJoinPool();
        SumRecursiveTask recursiveTask = new SumRecursiveTask(1, 10000L);
        Long result = pool.invoke(recursiveTask);
        System.out.println("result = " + result);
        long end = System.currentTimeMillis();
        System.out.println("消耗的时间为: " + (end - start));
    }

    static class SumRecursiveTask extends RecursiveTask<Long> {
        private static final long THRESHOLD = 3000L;
        private final long start;
        private final long end;

        public SumRecursiveTask(long start, long end) {
            this.start = start;
            this.end = end;
        }

        @Override
        protected Long compute() {
            long length = end - start;
            if (length <= THRESHOLD) {
                // 任务不用再拆分了.可以计算了
                long sum = 0;
                for (long i = start; i <= end; i++) {
                    sum += i;
                }
                System.out.println("计算: " + start + " -> " + end + ",结果为: " + sum);
                return sum;
            } else {
                    // 数量大于预定的数量,任务还需要再拆分
                long middle = (start + end) / 2;
                System.out.println("拆分: 左边 " + start + " -> " + middle + ", 右边 " + (middle +
                        1) + " -> " + end);
                SumRecursiveTask left = new SumRecursiveTask(start, middle);
                left.fork();
                SumRecursiveTask right = new SumRecursiveTask(middle + 1, end);
                right.fork();
                return left.join() + right.join();
            }
        }
    }
}
7、Optional类
1、初体验
1、以前对null的处理方式
public class OptionalDemo1 {

    public static void main(String[] args) {
        String userName = "xiaobear";
        if (userName != null) {
            System.out.println("用户名为:" + userName);
        }else {
            System.out.println("用户名不存在!");
        }
    }
}
2、Option的使用
public class OptionalDemo2 {

    public static void main(String[] args) {
        Optional<String> xiaobear = Optional.of("xiaobear");
//        Optional<String> xiaobear = Optional.of(null);
//        Optional<Object> xiaobear = Optional.ofNullable(null);
        //判断是否包含值
        if(xiaobear.isPresent()){
            String s = xiaobear.get();
            System.out.println("用户名为:" + s);
        }else {
            System.out.println("用户名不存在!");
        }
    }
}
2、Optional的基本使用
Optional是一个没有子类的工具类,Optional是一个可以为null的容器对象。它的作用主要就是为了解决避免Null检查,防止NullPointerException。
Optional类的创建方式:
Optional.of(T t) : 创建一个 Optional 实例
Optional.empty() : 创建一个空的 Optional 实例
Optional.ofNullable(T t):若 t 不为 null,创建 Optional 实例,否则创建空实例
Optional类的常用方法:
isPresent() : 判断是否包含值,包含值返回true,不包含值返回false
get() : 如果Optional有值则将其返回,否则抛出NoSuchElementException
orElse(T t) : 如果调用对象包含值,返回该值,否则返回参数t
orElseGet(Supplier s) :如果调用对象包含值,返回该值,否则返回 s 获取的值
map(Function f): 如果有值对其处理,并返回处理后的Optional,否则返回 Optional.empty()
3、Optional的高级使用
public class OptionalDemo3 {

    public static void main(String[] args) {
        Optional<String> optional = Optional.of("张三");

//        Optional<Object> optional = Optional.empty();
        //存在则输出
        optional.ifPresent(System.out::println);
        //如果empty包含值,则返回该值,不包含则为空
        System.out.println(optional.orElse(null));

        optional.orElseGet(() -> {return "未知的用户名";});
    }
}
8、日期和时间
1、旧版日期时间API存在的问题
- 设计很差: 在java.util和java.sql的包中都有日期类,java.util.Date同时包含日期和时间,而java.sql.Date仅包
含日期。此外用于格式化和解析的类在java.text包中定义。- 非线程安全:java.util.Date 是非线程安全的,所有的日期类都是可变的,这是Java日期类最大的问题之一。
- 时区处理麻烦:日期类并不提供国际化,没有时区支持,因此Java引入了java.util.Calendar和java.util.TimeZone类,但他们同样存在上述所有的问题。
2、新版的日期和时间API
JDK 8中增加了一套全新的日期时间API,这套API设计合理,是线程安全的。新的日期及时间API位于 java.time 包中
| API | 描述 |
|---|---|
| LocalDate | 表示日期,包含年月日,格式为 2019-10-16 |
| LocalTime | 表示时间,包含时分秒,格式为 16:38:54.158549300 |
| LocalDateTime | 表示日期时间,包含年月日,时分秒,格式为 2018-09-06T15:33:56.750 |
| DateTimeFormatter | 日期时间格式化类 |
| Instant | 时间戳,表示一个特定的时间瞬间 |
| Duration | 用于计算2个时间(LocalTime,时分秒)的距离 |
| Period | 用于计算2个日期(LocalDate,年月日)的距离 |
| ZonedDateTime | 包含时区的时间 |
Java中使用的历法是ISO 8601日历系统,它是世界民用历法,也就是我们所说的公历。平年有365天,闰年是366
天。此外Java 8还提供了4套其他历法,分别是:
- ThaiBuddhistDate:泰国佛教历
- MinguoDate:中华民国历
- JapaneseDate:日本历
- HijrahDate:伊斯兰历
3、日期和时间类
LocalDate、LocalTime、LocalDateTime类的实例是不可变的对象,分别表示使用 ISO-8601 日历系统的日期、时间、日期和时间。它们提供了简单的日期或时间,并不包含当前的时间信息,也不包含与时区相关的信息。
public class LocalDateTimeDemo1 {

    public static void main(String[] args) {
        LocalDate date = LocalDate.of(1999, 10, 01);
        System.out.println("创建的日期为:" + date);
        LocalDate now = LocalDate.now();
        System.out.println("当前日期为:" + now);
        //获取日期信息
        System.out.println(now.getYear());
        System.out.println(now.getMonthValue());
        System.out.println(now.getDayOfMonth());
        System.out.println(now.getDayOfWeek());

        LocalDateTime nowDateTime = LocalDateTime.now();
        System.out.println("当前时间为" + nowDateTime);
        System.out.println(nowDateTime.getYear());
        System.out.println(nowDateTime.getMonthValue());
        System.out.println(nowDateTime.getDayOfMonth());
        System.out.println(nowDateTime.getHour());
        System.out.println(nowDateTime.getMinute());
        System.out.println(nowDateTime.getSecond());
        System.out.println(nowDateTime.getNano());
    }
}
对日期时间的修改,对已存在的LocalDate对象,创建它的修改版,最简单的方式是使用withAttribute方法。withAttribute方法会创建对象的一个副本,并按照需要修改它的属性。以下所有的方法都返回了一个修改属性的对象,他们不会影响原来的对象。
public class LocalDateTimeDemo2 {

    public static void main(String[] args) {
        LocalDateTime now = LocalDateTime.now();
        System.out.println("当前时间为:"+now);

        //修改当前时间
        LocalDateTime with = now.withYear(2099);
        System.out.println("修改年份为:"+with);
        System.out.println("修改后是否相等:" + (now == with));
        System.out.println("修改月份: " + now.withMonth(6));
        System.out.println("修改小时: " + now.withHour(9));
        System.out.println("修改分钟: " + now.withMinute(11));
            // 再当前对象的基础上加上或减去指定的时间
        LocalDateTime localDateTime = now.plusDays(5);
        System.out.println("5天后: " + localDateTime);
        System.out.println("now == localDateTime: " + (now == localDateTime));
        System.out.println("10年后: " + now.plusYears(10));
        System.out.println("20月后: " + now.plusMonths(20));
        System.out.println("20年前: " + now.minusYears(20));
        System.out.println("5月前: " + now.minusMonths(5));
        System.out.println("100天前: " + now.minusDays(100));
    }
}
4、时间格式化与解析
通过
java.time.format.DateTimeFormatter类可以进行日期时间解析与格式化。
public class LocalDateTimeDemo3 {

    public static void main(String[] args) {
        LocalDateTime now = LocalDateTime.now();
        DateTimeFormatter timeFormatter = DateTimeFormatter.ofPattern("yyyy-MM-dd HH:mm:ss");
        //将日期格式化为字符串
        String format = now.format(timeFormatter);
        System.out.println(format);

        // 将字符串解析为日期时间
        LocalDateTime parse = LocalDateTime.parse("1985-09-23 10:12:22", timeFormatter);
        System.out.println("parse = " + parse);
    }
}
5、Instant 类
Instant 时间戳/时间线,内部保存了从1970年1月1日 00:00:00以来的秒和纳秒。
public class InstantDemo {

    public static void main(String[] args) {
        Instant now = Instant.now();
        System.out.println("当前时间戳为:" + now);
        // 获取从1970年1月1日 00:00:00的秒
        System.out.println(now.getNano());
        System.out.println(now.getEpochSecond());
        System.out.println(now.toEpochMilli());
        System.out.println(System.currentTimeMillis());
        Instant instant = Instant.ofEpochSecond(5);
        System.out.println(instant);
    }
}
6、计算日期时间差类
Duration/Period类: 计算日期时间差。
- Duration:用于计算2个时间(LocalTime,时分秒)的距离
- Period:用于计算2个日期(LocalDate,年月日)的距离
public class DurationDemo {

    public static void main(String[] args) {
        LocalTime now = LocalTime.now();
        LocalTime of = LocalTime.of(14, 15, 20);
        //计算时间差
        Duration between = Duration.between(now, of);
        System.out.println("相差的天数:" + between.toDays());
        System.out.println("相差的小时:" + between.toHours());
        System.out.println("相差的分钟:" + between.toMinutes());
        System.out.println("相差的秒数:" + between.getSeconds());

        LocalDate localDate = LocalDate.now();
        LocalDate date = LocalDate.of(2021, 8, 31);
        //比较日期差
        Period period = Period.between(localDate, date);
        System.out.println("相差的年份:" + period.getYears());
        System.out.println("相差的月份:" + period.getMonths());
        System.out.println("相差的天数:" + period.getDays());
    }
}
7、时间校正器
有时我们可能需要获取例如:将日期调整到“下一个月的第一天”等操作。可以通过时间校正器来进行。
- TemporalAdjuster : 时间校正器。
- TemporalAdjusters : 该类通过静态方法提供了大量的常用TemporalAdjuster的实现。
public class TemporalAdjusterDemo {

    public static void main(String[] args) {
        LocalDateTime now = LocalDateTime.now();
        //得到下个月的第一天
        TemporalAdjuster temporalAdjuster = temporal -> {
            LocalDateTime dateTime = (LocalDateTime) temporal;
            LocalDateTime nextMonth = dateTime.plusMonths(1).withDayOfMonth(1);
            System.out.println("nextMonth = " + nextMonth);
            return nextMonth;
        };
        LocalDateTime with = now.with(temporalAdjuster);
        System.out.println("下个月为:"+with);
    }
}
8、设置日期时间的时区
Java8 中加入了对时区的支持,LocalDate、LocalTime、LocalDateTime是不带时区的,带时区的日期时间类分别为:ZonedDate、ZonedTime、ZonedDateTime。
其中每个时区都对应着 ID,ID的格式为 “区域/城市” 。例如 :Asia/Shanghai 等。
ZoneId:该类中包含了所有的时区信息。
public class SetTimeZoneDemo {

    public static void main(String[] args) {
        //获取所有时区ID
        ZoneId.getAvailableZoneIds().forEach(System.out::println);

        //不带时间,获取计算机的当前时间
        LocalDateTime now = LocalDateTime.now();
        System.out.println("now = " + now);

        //操作带时区的类
        ZonedDateTime zonedDateTime = ZonedDateTime.now(Clock.systemUTC());
        System.out.println("zonedDateTime = " + zonedDateTime);

        //使用计算机的默认的时区,创建日期时间
        ZonedDateTime dateTime = ZonedDateTime.now();
        System.out.println("dateTime = " + dateTime);

        // 使用指定的时区创建日期时间
        ZonedDateTime now2 = ZonedDateTime.now(ZoneId.of("America/Vancouver"));
        System.out.println("now2 = " + now2);
    }
}
总结
LocalDate表示日期,包含年月日
LocalTime表示时间,包含时分秒
LocalDateTime = LocalDate + LocalTime 时间的格式化和解析,通过DateTimeFormatter类型进行
学习了Instant类,方便操作秒和纳秒,一般是给程序使用的.学习Duration/Period计算日期或时间的距离,还使用时间调整器方便的调整时间,学习了带时区的3个类ZoneDate/ZoneTime/ZoneDateTime
JDK 8新的日期和时间 API的优势:
- 新版的日期和时间API中,日期和时间对象是不可变的。操纵的日期不会影响老值,而是新生成一个实例。
- 新的API提供了两种不同的时间表示方式,有效地区分了人和机器的不同需求。
- TemporalAdjuster可以更精确的操纵日期,还可以自定义日期调整器。
- 是线程安全的
| 1 | 1 | 1 |
|---|---|---|
| 1 | 1 | 1 |
| 1 | 1 | 1 |
| 1 | 1 | 1 |
